
Get your first ZhiFlo reply in Codex
Allow about 15 minutes | Requires Codex and CC Switch | Finished when Codex returns
OK
This guide takes you through one real connection. An installed app, a completed import, or a saved settings screen does not prove the full path works; the final OK response does.
Terms to know before you start
Section titled “Terms to know before you start”- A key created on the portal’s API Keys page is what this guide calls a Token. Treat it as the password for access to the ZhiFlo API.
- A group determines which set of services the Token can use. Choose a group currently available to your account.
- A provider is the connection saved in CC Switch with the service URL, Token, and model settings. This guide uses ZhiFlo as the provider.
- A model ID is the complete identifier sent in a request. Copy the complete value from your account’s list; it may differ from the display name, and a value from another guide may not work for you.
Before you start
Section titled “Before you start”- Sign in to the ZhiFlo API portal.
- Install Codex from the official Codex project and confirm that
codex --versionprints version information. - Install and open CC Switch. Expand Assets on the download page and choose the installer that matches your operating system and processor.
A terminal is the window where you enter commands. On Windows, search for PowerShell from Start. On macOS, press Command-Space and search for Terminal. On Linux, open Terminal from the application menu.
A version number confirms that Codex is installed. The connection is complete only after Codex returns a reply in the final step.
What you will finish on this page
Section titled “What you will finish on this page”- Create one Token for this device and Codex.
- Open the CC Switch import from that Token row.
- Confirm that ZhiFlo is active inside CC Switch.
- Restart Codex and see
OK.
1. Open API Keys
Section titled “1. Open API Keys”Open API Keys in the ZhiFlo API portal.
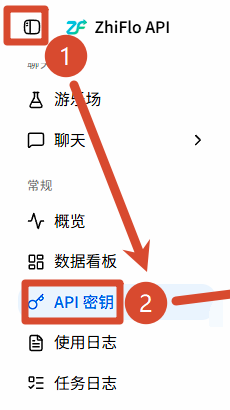
The highlighted navigation item opens Token management. You should see your API key list, which may be empty.
2. Create a dedicated Token
Section titled “2. Create a dedicated Token”Select Create API Key.
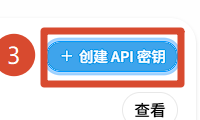
The highlighted control is Create API Key.
Enter a name that identifies the device and client, such as “Laptop Codex.” Select an available group, then choose a finite expiration and quota before creating the key.
Treat the Token like a password. Create one for this device and Codex, avoid unlimited expiration or quota, and never put the complete value in chat, screenshots, or a public repository.
Copy the new Token into a trusted password manager. Back in the list, you should see the name you just created.
3. Start the CC Switch import
Section titled “3. Start the CC Switch import”Open the action menu on the new API key row and select CC Switch.
The Import to CC Switch dialog should open. If it does not, make sure you used the action on the API key row rather than another control on the page.
4. Choose Codex and a model
Section titled “4. Choose Codex and a model”In Import to CC Switch, select Codex, then select a model available to your account.
Use a model from your own list instead of copying a model name from another guide. The dialog should now show Codex and the complete model ID.
5. Hand the import to CC Switch
Section titled “5. Hand the import to CC Switch”Select Open CC Switch. If the browser asks permission to open an external application, allow it to open your installed CC Switch app.
Start this action only from the signed-in ZhiFlo API portal on a trusted device. Do not copy, forward, or construct the app deep link by hand.
6. Confirm the import
Section titled “6. Confirm the import”In the CC Switch import preview, confirm that the app is Codex, the provider is ZhiFlo, the API endpoint is https://api.zhiflo.com/v1, and the model ID matches your selection.
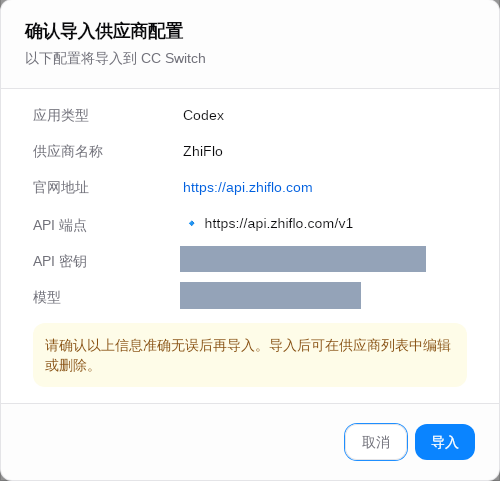
The screenshot uses the Chinese interface. The Token and dynamic model ID are redacted; verify your own values instead of copying a model from the image.
Select 导入, which means Import, after checking the values. The ZhiFlo card should appear in the Codex provider list. If it does not, reopen the preview and complete the final import action.
7. Confirm that ZhiFlo is active
Section titled “7. Confirm that ZhiFlo is active”After a normal import, ZhiFlo should already be the active provider. Check the Codex provider list: CC Switch 3.17.0 uses a blue border and pale-blue shading for the current provider. Other versions may show Active, Currently enabled, or an equivalent state.
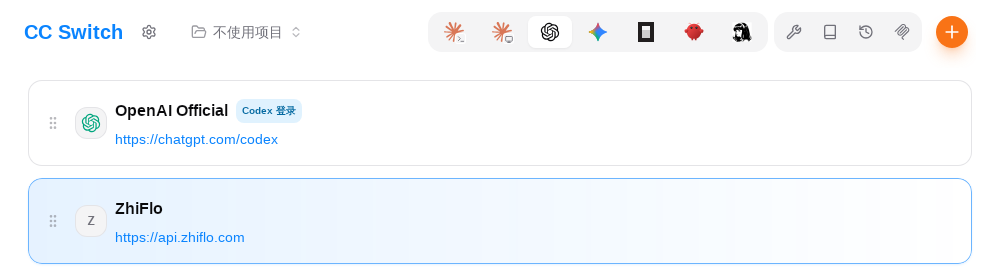
The blue ZhiFlo card is the current Codex provider. If your ZhiFlo card does not have the current state, select it to finish switching.
8. Restart Codex completely
Section titled “8. Restart Codex completely”Exit every running Codex session and close old terminal windows. Open a new terminal and start Codex again. A process that was already running will not read the newly imported provider.
If Codex still shows the previous provider, return to CC Switch, confirm that ZhiFlo is active, then exit and reopen Codex once more.
9. Send the first prompt
Section titled “9. Send the first prompt”Start Codex in an empty folder that does not contain important files, then send:
Do not modify any files. Reply with OK only.
This is a real terminal result captured after the same CC Switch import. The screenshot uses the Chinese equivalent of the prompt above; OK is the same success signal.
When Codex returns OK, the setup is complete. You have confirmed all four moving parts together: the Token works, the model works, CC Switch is using ZhiFlo, and Codex can send a real request.
For a 401, model error, or missing reply, follow the matching symptom in Troubleshoot connection problems. Avoid creating multiple Tokens or trying random model names.